Is your smartphone always so out of time that you think about buying a portable phone charger? Take your time, now we will tell you how to make an external battery with your own hands. In this article, we present 4 best methods of making a portable charger – choose anyone.
It is not always possible to charge the gadget from the mains. In this case, a portable phone charger is a must. But since it is quite a popular thing, there is a lot of low-quality junk on the market. It’s easy to make a mistake. But let’s not make a mistake – it’s better to just make your portable phone charger.
You may also like: 9 Best Portable Generators for Camping (Comparison & Reviews)
1. Old battery – new possibilities
How do I make a phone charger out of an outdated phone battery? – Just… A step-by-step description of the method will help you avoid mistakes.
You need:
- Battery from an old phone
- Wires
- Controller
- USB input
- Tape, duct tape, thermal adhesive.
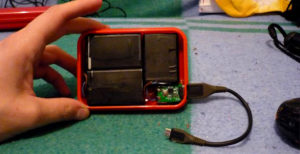
- Take the old phone, get the battery out of it. You will need three, six, or nine of these. The bigger, the longer the device will last.
- Stack three drives together, tape them up and wrap them in tape. At the same time, the terminals remain open.
- Find the right case.
- With the help of 2 wires combine 3 pieces together: one wire – “+”, the second wire – “-“. Do not connect the central terminals of the battery. They serve as a temperature sensor and the whole point of them is to show the remaining charge for a particular device.
- Mark the location of the controller and make an opening to insert the input.
- Fix all parts to the thermal adhesive. Here we go!

That’s it, in just 6 steps you got the portable battery.
All these manipulations are simple. The only thing that can stop you is not everyone has that many outdated batteries.
2. New use of a flashlight
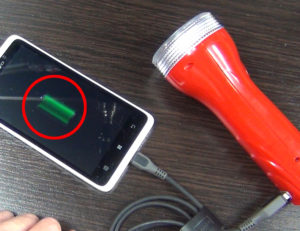
Do you have a flashlight? Now you will learn how to transform a flashlight so that it not only illuminates the road but also helps to stay in touch.
You need:
- A flashlight with a 3.7 V drive.
- Voltage converter with built-in USB output
- Power charge controller.
- Take apart the flashlight.
- A resistor with a soldered LED must be removed. This allows you to change one of the modes of glow to another mode – charging.
- Install a transducer with an output to the place where the plug was before used to charge the flashlight.
- Solder “+” and “-” from the battery to the battery charge controller. After that, you solder the 5 V converter to the OUT+/OUT contacts of the provided controller.
IMPORTANT. Before you do so, release one contact of the switch and solder the drive to it.
- Check to see if the unit is functioning properly. Solder if necessary.
- Mount the inverter and the controller. You are done!

Changing the flashlight like this will give you a double advantage on the hike. And the light is there, and it’s okay to be out of touch at any moment. The main thing here is to do everything right.
You may also like: 7 Best Portable Digital USB Oscilloscopes (Comparison & Reviews)
3. How to make a portable phone charger with batteries
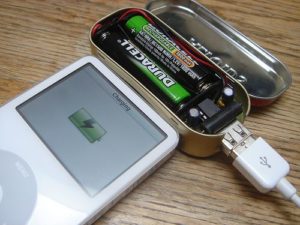
This method is like the first one, but here you will use a regular lithium-ion drive 18650 2200 mAh 3.6 V.
You need:
- Lithium-ion batteries 18650 2200 mAh 3.6 V. – 8 pcs.
- Charging car
- USB input
- Block casing with car relay
In just a few steps you’ll get what you want again – make your own portable phone charger:
- You need to cut 2 holes in the case: for the switch and the input.
- Solder the storage batteries together 4 pieces. Install them in the case.
- Joint blocks should be soldered to the switch, then from the switch to the board, from the board to the USB input.

This is probably the fastest way. This device will work even for the amateur because of its simplicity. Just 3 steps and the phone charger is ready.
4. Portable phone charger with solar battery
That’s another interesting option. As the light day begins to increase, it is important to discuss the benefits of solar energy storage. You will see how to make a portable battery charger that can be charged by solar panels.
You need:
- A lithium-ion energy storage device
- A case of the same drives
- 5 V 1 A voltage boost module
- Battery charge board
- Solar panel 5.5 V 160 mA (any size)
- Wires for connection
- 2 1N4007 diodes (others may be available)
- Velcro or double-sided adhesive tape for fixation
- Thermo glue
- Resistor 47 Ohm
- Contacts for energy storage (thin steel plates)
- A pair of tumblers
IMPORTANT. It is recommended to use the electric storage device together with the protection board to avoid damage.
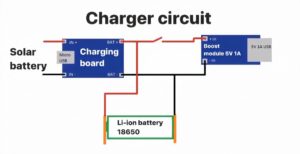
- Let’s study the basic layout of the external storage device.
The diagram shows 2 connection cables in different colors. Red connects to “+”, black connects to “-“.
- It is not recommended to solder the contacts to the lithium-ion battery, so let’s put the terminals in the case and fix them with the help of thermal glue.
- The next task is to place the voltage increase module and charging board for the battery. To do this we make holes for USB input and USB output 5 V 1 A, tumbler, and wiring to the solar panel.
- Insert a resistor (resistance 47 Ohm) into the USB output, on the backside of the module increasing the voltage. This makes sense for charging the iPhone. The resistor will solve the problem with the control signal that starts the charging process.
- To make the panel easy to carry, you can attach the panel contacts with 2 small contacts.
- Set the diode between 1 contact of the panel and the charging board of the energy storage device. You should put the diode with the arrow towards the charging board. This will prevent the storage battery from discharging through the solar panel.
IMPORTANT. Place the diode in the direction of the solar panel BEFORE the charging board.

How many charges will a phone charger like this last? It all depends on the capacity of your battery and the capacity of your gadget. Remember that it is extremely undesirable to discharge lithium drives below 2.7 V.
You may also like: 9 Top Quiet Portable Generators (Comparison & Reviews)
Choose the most suitable method for you and create your own portable phone charger. Such a thing will definitely come in handy on the road or while traveling. The advantages of the device made mass. This is a unique look, and also a way to get the power that will meet your needs. With the portable battery, you can charge not only phones but also tablets, wireless headphones, and other small gadgets.