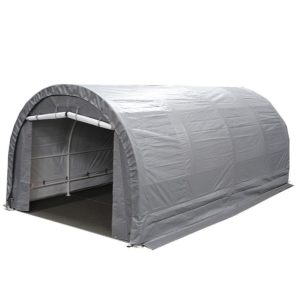
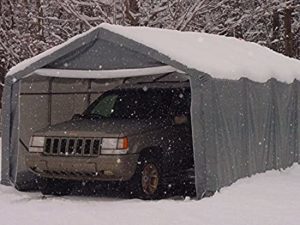
Portable garages are quite popular due to their convenience and the short time of assembly. They are the perfect decision for the summer tent for your vehicle, or just for being an alcove for you and your friends. The only question: why so many portable garages start to look like pieces of trash over time?
 That mainly happens because people tend to forget the true aim of those items. Enjoying it the first months during the warm and sunny weather, they start to think that the portable garage is actually a reliable and enduring thing and that it can be used as the regular garage.
You may also like: 10 Best Portable Canopies (Comparison & Reviews)
That is the main mistake of the most portable garages’ owners since, in fact, those garages aren’t meant to be used all the time of the year.
If you leave them like this, they are going to wear out quickly, ending looking like they are 100 years old and disappointing you. Or, your portable garage may even not to stand the unpleasant weather conditions and crash down.
In order to avoid that, there is a number of stapes that you can take in order to reinforce your portable garage.
If you’re here, most likely you’re the owner of one – you know how this item can be versatile and convenient but it requires high maintenance as well. The reason is this garage usually consists of fabric or rainwear fabric – and it can withstand quite severe weather conditions – depending on the materials of the barrels it is fixed on.
 Though, nothing guarantees the total safety of your portable garage. With time it can get dilapidated, shaky, and damaged. And, being completely honest with time it starts looking like the homeless shelter – especially if you never put enough effort into its cleaning.
What is more, it might seem tricky to reinforce a portable garage from the first sight – but with the right instruction, the whole process is quite feasible.
If your garage is not assembled:
First of all, you need to open the box with all the parts of the garage – they usually come in compact packages so there are no problems with the storage of it. Then you take out the fabric – the cover of the garage and then the barrels. You might be a little bit overwhelmed by the number of all the barrels and details, but don’t worry, it’s not that scary as it looks.
The second step that you need to do after you unpacked everything is to lay them down according to the scheme they would be assembled. Each brand has a separate instruction, so you should take a look at the pictures first and then place all the details on the ground. It will make the further process of assembly ten times easier, trust us.
Then start assembling the basement. Then assemble the rooftop barrels and overall perimeter of the garage. Hold on to stick all the details together – just assemble each wall and lay them down on the ground. By the way, a useful piece of advice here is not to assemble all those parts on your own especially if you’re not very tall.

It might turn out really difficult for you to hold the barrels and the garage wall itself since the average height of portable garages is 6,5 feet. If you have no other choice but to assemble the whole construction alone, then find an object to lean on – it can be a high wall or a high tree – depending on your location.
Then connect all the walls together – with additional barrels so your garage can already stand on its own. Then maybe find a ladder and use it to fix the additional barrels on the sides of the garage – these are, obviously, for the more stable and sturdy construction.
It wasn’t really mentioned before, but pay attention that any decent set of the construction materials for the portable garage should include the full set of nuts, screws, and, in the best case, the screwdrivers. Pay attention to the materials of those – it depends directly, how longlasting the construction of the garage is going to be.
Thus, assembling the garage on your own might be a little bit tricky, especially when you need to place tons of screwdrivers all over the construction. It is better to assemble it together with others.
For the assembled portable garages:

The tent can get dilapidated or even crash at the first fit of the strong wind, and if there is something valuable inside your garage or even worse – you are inside – the things won’t go well for you. In order to make sure that this won’t happen, you need to invent the additional barrels on the sides of the wall.
The best universal reinforcing construction in this sense is the crossing diagonal barrels inside the square/rectangle wall of the garage. This way it will withstand even strong physical pressure, including being hit by different objects.
If you want your tent to last more than a year, you need to add some wooden elements to the tent (well, the details don’t have to be made out of the wood, but there are probably no alternatives for the materials that can be as sturdy and as easily manipulated as the wood is).
You will need to create from 5 to 10 short planks made out of the wood – and their length should suit the sizes of your portable garage framework, In order to create those planks, you will need to cut them on the special sawing machine tool (if you don’t have those in your non-portable garage, you might want to get yourself a portable one.
After you finished with the cutting of planks, you need to make the hole for the screws. After that, you need to find a spacious board where you are going to fix those planks. It is a lot of hassle, but it will pay itself back in the long term.
Depending on the size of your garage, find a board that takes at least 1/3 of its wall size. Then tight all the construction by inserting the screws into the holes.
So basically you guessed it – you need to create a wooden wall for your portable garage in other it could survive all the harsh weather including the wintertime.
You may also like: 9 Best Portable Drill Presses (Comparison & Reviews)
If you want to replace the fabric:

A good question is where you can get it.
- You can get it right from a manufacturer, however, it requires the deeper searching and some time to contact that supplier. Moreover, if you contact the manufacturer of the raincoat fabrics, you will probably get just a simple piece of it that needs to be crafted before the usage. For sewing it and tailoring for your tent you will have to use the services of a tailor, or even special manufacture, so the initial costs are expected to be high.
- Explore your local yard sales and garage sales market. Just like you can search there for a completely new portable garage, you can also search for a fabric for it – who knows, if you live in a more or less densely populated area, the chance of finding one is comparatively high.
- You can replace the classic expensive raincoat fabric with the harsh fabric made of plastic – the one they use in the giant bags on plants and factories. It won’t look aesthetical, but it is a budget and the most feasible option.
While covering your garage with that fabric, look for it is placed equally on both sides – otherwise, the inequality of the weight can cause slipping or even the leaning of the garage. When the tent is covered, start tackling the edges of the fabric into the narrow space between walls and the roof.
By the way, for the people who don’t want any extra hassle and who don’t care about the aesthetic looks of the garage – you can use the simple tape (well, the big one that they use on the large scale manufacturing) and fix the fabric better.

You can buy a huge piece of wool, polyester, nylon, and other types of fabric and any closest craft store. If your local craft store doesn’t distribute the pieces large enough, you can, once again, make an order from a manufacturer (it’snot going to be that difficult as with the original tent fabric).
After all the details are ready to start pulling the fabric on the top of the framework but don’t make the process complete yet. Leave it’s hanging on the top.
Then start fixing the wooden parts that you made before – you can pace them at the sides of the garage or at the bottom of it – there is no big difference, just one aspect is for the extreme wind it is still better to place the heavy wooden parts at the bottom.
For the more lightweight wooden parts – you can place them even at the top of the garage for a better shield. After that, all you have to do is to pull the rest of the fabric on. And if you want to go all crazy you can even fix the wooden parts all over the portable garage. It will guarantee it will serve you a long life.
After installation of wooden barrels and boards don’t forget to additionally fix them with the metallic parts and screws, to make sure everything stays in one place. For the colder months, don’t forget to fix the fabric with heavy objects from the outside so the wind couldn’t rip that off.
Apart from the wooden planks and barrels, another curious decision for fixing your portable garage and make it more stable are the ropes. Yes, you can thread them through the fabric of your tent and then fix them together or stick them to the wooden basement. This way you can build up a pretty decent garage for your car.
You may also like: 9 Best Portable Generators for Camping (Comparison & Reviews)
One more interesting decision for your garage that you might like is to make the wooden gates for it. You can make them yourself on the sawing machine – of course, if you have enough time.
If not, you can always explore the yard sales, however, the best way to get those gates here will be either asking your neighbors or ordering those gates at a company that focuses on the production of fences.
It is also worth mentioning that there are lots of types of portable garages on the market and the diversity of different brands – each one provides different materials and, what is more important, the different sizes of garages. Obviously, the reinforcement of the bigger garage will take a longer time – and the 2x models seem to be more popular on the market.
Hopefully, you enjoyed this full guide on how you can reinforce your portable garage and make it serve you a long life without extra hassle and expenses. For a better understanding, we highly recommend watching the tutorial on YouTube, which you can see below.